Table of Content
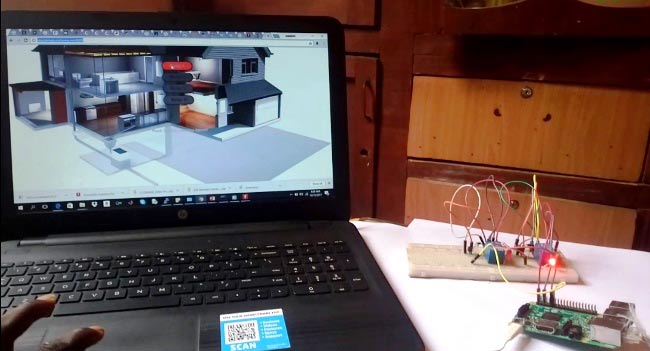
This way we can control the Raspberry Pi GPIO using WebIOPi. If you made your JS files the same way I did, you can save them and then move them with Filezilla to webapp/HTML/scripts after you've finished making them. Today, we will design an IoT based Web Controlled Home Automation System using Raspberry Pi 4, where we will control home appliances with RPi4. Now, for designing dashboard in Blynk app to control the home appliance, download the app from the link.

The button's text shadow and button shadow are two of the few supplementary features found in the block's other section. To top it all off, pressing the button triggers a subtle transition effect, making it look polished and lifelike. To guarantee optimal page performance on all browsers, these are defined independently for WebKit, firefox, opera, etc.
The CSS Code:
I love to write about technology and learn or thinking about latest techno. And my forever ever love technology project is Raspberry Pi. Here the location I have made to the homepage named as ‘raspberrykits,’ but you can set it to the light page too. The code here will compile and run the script ‘lighton.py’ within seconds.
It also includes PIR based intruder detection for the security of the farm. Now, you can use your Arduino code in Raspberry Pi. We will control an AC bulb online so, click on Web-Connected LED example and connect your relay module as shown in circuit diagram. We will start with creating an account on the particle cloud and knowing the interface of the particle platform. You got the Raspberry Pi and ready to make your DIY home project, right? How good if you get to know about an IoT home automation projects to control your house stuff like CCTV, Fan, and Lights?
more advanced iot project
The proposed irrigation system will be very efficient and cost effective in these. This paper presents a farm automation system which is based on Raspberry pi and Arduino microcontroller. With the help of Image processing and IoT, it senses plant growth, detects the leaf diseases, detects the fruits and communicate these information to the farmer through a web page.
With this done, connect the led to your raspberry pi as shown in the schematics below. Before jumping in to schematics and codes, With the Raspberry Pi back on, we will need to test our WebIOPi installation to be sure everything works fine as desired. Everything else in the script is similarly optimized for readability and brevity. You can play with them and see what happens; this kind of learning is known as "learning by doing," I believe. However, CSS's strengths lie in its simplicity, and its rules are written in plain English.
regarding patch file
We can instruct the WebIOPi program to use GPIO23 for output. Four buttons are now available, but you may add more if necessary. Unfortunately, I could not locate a version of WebIOPi that is compatible with the Pi 4; thus, we have to download a patch before proceeding with the setup. Run the instructions below from within the WebIOPi directory to apply the patch. We'll be using the WebIOPi framework, notepad++ on your PC, and FileZilla to transfer files from your computer to the raspberry pi and the Raspbian operating system. Adafruit SHT40 Temperature and Humidity Sensor Board integrates a fourth-generation sensor and is designed with a true I2C interface.
All these can be done remotely without going near to the devices or to stay near the plugs to on/off the switches. In India, around 80% of population depends upon farming and one third of the nation's economy is based on farming. In areas like plantation, nursery, house gardens etc, watering of plants at regular interval matters.
Get our free apps
The html code pulls everything together, javascript and the style sheet. The CSS script feels too bulky to include here so I will just pick part of it and use them for the breakdown. CSS is easy and you can understand it just by going through the CSS code. You can easily skit this part and use our CSS code straight away.
In the last tutorial, we learned how to construct a system for tallying individuals using Raspberry Pi, astute subtraction, and blob tracking. We demonstrated the total number of building entrances and exits. Feature computation and HOG theory were also discussed.
Free access to premium services like Tuneln, Mubi and more. Instant access to millions of ebooks, audiobooks, magazines, podcasts and more. Enjoy access to millions of ebooks, audiobooks, magazines, and more from Scribd.

You can also attach the Raspberry Pi touchscreen monitor with the setup. It will let you check the status of the lights, fans, etc. whether they are turned on or off on the screen. You can easily manage this setup without attaching any display. Semicon Media is a unique collection of online media, focused purely on the Electronics Community across the globe. With a perfectly blended team of Engineers and Journalists, we demystify electronics and its related technologies by providing high value content to our readers. Dear sir, I tried to download the patch file before installing webiopi.
Make sure your Raspberry Pi is connected to internet. Also, you can change the code according to your need but you have to fork example code you want to use. We have to install the Particle agent in our Raspberry Pi to connect it with the Particle Cloud. Particle Agent is a software service which runs in the background to interacts with the GPIO pins of the Raspberry pi. Before installing the agent, you have to make an account on the Particle.io. This project aims at developing a system which gives body temperature and heart rate using LM35 and pulse sensor respectively which are interfaced with controller node MCU.
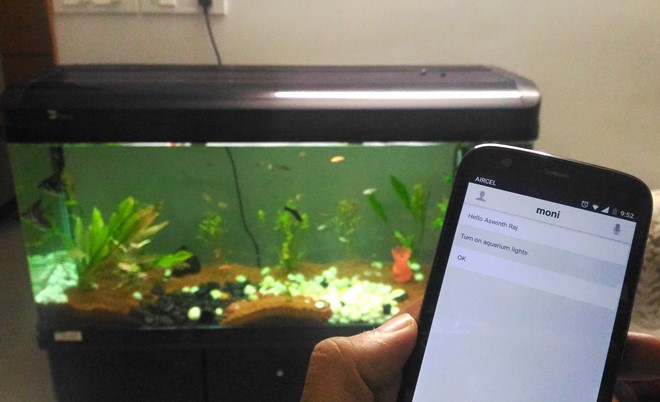
The Internet of things technology is entering our homes as well as in industries. Here at Microtronics, we have designed and developed an IOT based Home Automation using Raspberry Pi. This project does the task of automation of home appliances. Also, using this project, any person can activate or deactivate home appliances using the internet.
Raspberry Pi, ESP8266,
Well, IoT is not as challenging project as the general perception people are having about. In fact, it provides quick and easy ways to make communication between different devices on the web. Today, I will show you how you can build a Raspberry Pi home automation project for your daily home tasks. Its an habit of some sort for me and i think it’s a good one, the first thing I do each time i want to use the Raspberry Pi is to update the PI.
NevonProjects works towards development of research based software, embedded/electronics and mechanical systems for research & development purposes. // Last time, we only needed to declare pins in the setup function. Apart from using online IDE, you can download the Particle Desktop IDE and Workbench where you can write code and flash in the same way as online IDE. But these IDEs are also online development softwares. For more information about Particle cloud, you can check the official documentation here. It is assumed that your Raspberry Pi is already flashed with an operating system.


No comments:
Post a Comment