Table of Content
You can control motors, read sensor data, and make cool IoT applications over the internet using Adafruit IO. For test and try, with some limitation, Adafruit IO is free to use. Controlling AC appliances with the click of buttons on a webpage using internet. The code snippets up top alter the button's color depending on the user's selection.
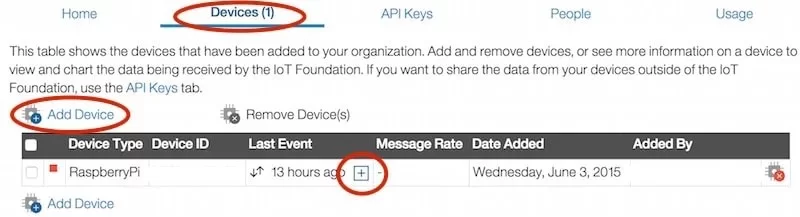
Here we propose an IOT based home automation system using raspberry pi that automates home appliances and allows user to control them easily through internet from anywhere over the world. Our proposed system consists of a microcontroller based circuit that has lights and fan connected to it along with LCD display and Wifi connector interfaced with raspberry pi. Our system interacts with out online IOT system that IOT Gecko free web interface for controlling our home appliances with ease. After linking with IOT Gecko, the user is allowed to send load switching commands over IOT to our circuit.
Hardware Requirement
There are many IoT platforms like Blynk, ThingSpeak etc. that you can use to connect Raspberry Pi to IoT clouds, but particle cloud platform has some awesome features which makes it different from others. Like you can run your Arduino code in your Raspberry Pi using the particle cloud IDE and can program your Pi from anywhere in the world, now that’s something cool!! Also, you can easily integrate IFTTT, Google Cloud, or Microsoft Azure. Particle Cloud is a very popular IoT platform which can help you to start with everything that you want to do in your IoT device. Particle is a reliable, scalable, and secure IoT device platform.
The proposed irrigation system will be very efficient and cost effective in these. This paper presents a farm automation system which is based on Raspberry pi and Arduino microcontroller. With the help of Image processing and IoT, it senses plant growth, detects the leaf diseases, detects the fruits and communicate these information to the farmer through a web page.
Step 3: Run Blynk App for Controlling Home Appliances
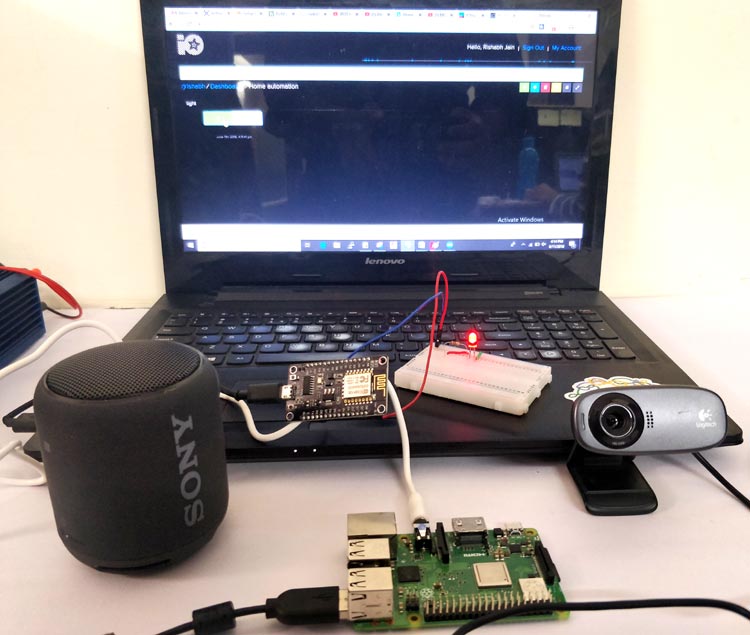
This URL is nothing but the PHP file which is a form of an API which performs the task to analyze the contents of the .txt file. At this time, the Raspberry Pi checks all of the program lines consistently. If the request is true, then the server responds with the help of the relay and GPIO pins to On/Off the switch of the respective object. Using the Raspberry Pi, web server, internet, and some other hardware, you will control the lights and fans in your living room. You will also be able to monitor the functioning of the CCTV camera you placed in front of your main door.
So that the website will look like the one in the picture below, I built a custom style sheet called smarthome.css. WebIOPi can make several distinct types of push buttons. This code instructs the WebIOPi program to generate a GPIO key that operates on the GPIO pin identified as "Relay 1" above.
Special Offer to SlideShare Readers
I want to make home automation using arduino and esp8266 module. I want to control home appliances with app using wifi. The second line points the html page to our jQuery script, the third points it in the direction of our style sheet. Lastly the last line helps set up an icon to be used on the mobile desktop in case we decide to use it as a web app or as a favicon for the webpage. The last thing we want to do is give some sort of indication when button has been pressed.
If you are new with all these, follow our previous article to learn how to use blynk with Raspberry pi. The main advantage of this project is that devices can be controlled from a remote location. Started in 2012 NevonProjects an initiative by NevonSolutions Pvt. Ltd grows exponentially through its research in technology.
IOT Based Web Controlled Home Automation Using Raspberry PI: March 2019
The button's text shadow and button shadow are two of the few supplementary features found in the block's other section. To top it all off, pressing the button triggers a subtle transition effect, making it look polished and lifelike. To guarantee optimal page performance on all browsers, these are defined independently for WebKit, firefox, opera, etc.
To keep this brief, every other thing in the code was also done to make it look good. The other part of the button block has few extras for text shadow on the button and button shadow. It also has a slight transition effect which helps it look nice and realistic when the button is pressed. These are defined separately for webkit, firefox, opera etc just to ensure the web page performs optimally across all platforms. After creating the JS files, we save it and then copy it using filezilla to webapp/html/scripts if you created your files the same way I did mine.
Everything we can monitor and control using advanced technologies. Remote access is a wonderful feature that came because of high speed internet. The main objective of proposed system is to provide a technology oriented and low cost system to make an advanced industry for those who away from their industry and want to control devices. Today Home Automation is one of the growing requirement in the society. This paper presents the implementation of Home Automation using Raspberry Pi.
We can instruct the WebIOPi program to use GPIO23 for output. Four buttons are now available, but you may add more if necessary. Unfortunately, I could not locate a version of WebIOPi that is compatible with the Pi 4; thus, we have to download a patch before proceeding with the setup. Run the instructions below from within the WebIOPi directory to apply the patch. We'll be using the WebIOPi framework, notepad++ on your PC, and FileZilla to transfer files from your computer to the raspberry pi and the Raspbian operating system. Adafruit SHT40 Temperature and Humidity Sensor Board integrates a fourth-generation sensor and is designed with a true I2C interface.
Particle agent is successfully installed in the Pi and running in background. You can get more information agent using below commands. Let’s start exploring the Particle cloud platform by making as simple Raspberry Pi application to control Home AC appliances using Particle Mobile app and online Particle IDE from anywhere in the world.
And the most important feature of this project is that these devices can be controlled from any place in the world. This project is used in controlling home appliances via WiFi technology. This electronic kit can be connected to any home appliance. One of the good things about the Raspberry Pi is the great ability and ease with which it gives you the opportunity to connect devices to the internet especially for Home Automation Related Projects. Today we are going to explore the possibility of controlling AC appliances with the click of buttons on a webpage using internet.


No comments:
Post a Comment